Connecting Edbound MCP with other MCP Clients
This guide walks you through connecting your AI tool to Edbound using the Model Context Protocol (MCP). When setting up workflows, carefully review the permissions and data access levels of each agent and MCP tool.bound account based on the tools you've enabled for the key.
Before you start
Before connecting an AI tool, generate an MCP key in your Edbound account:
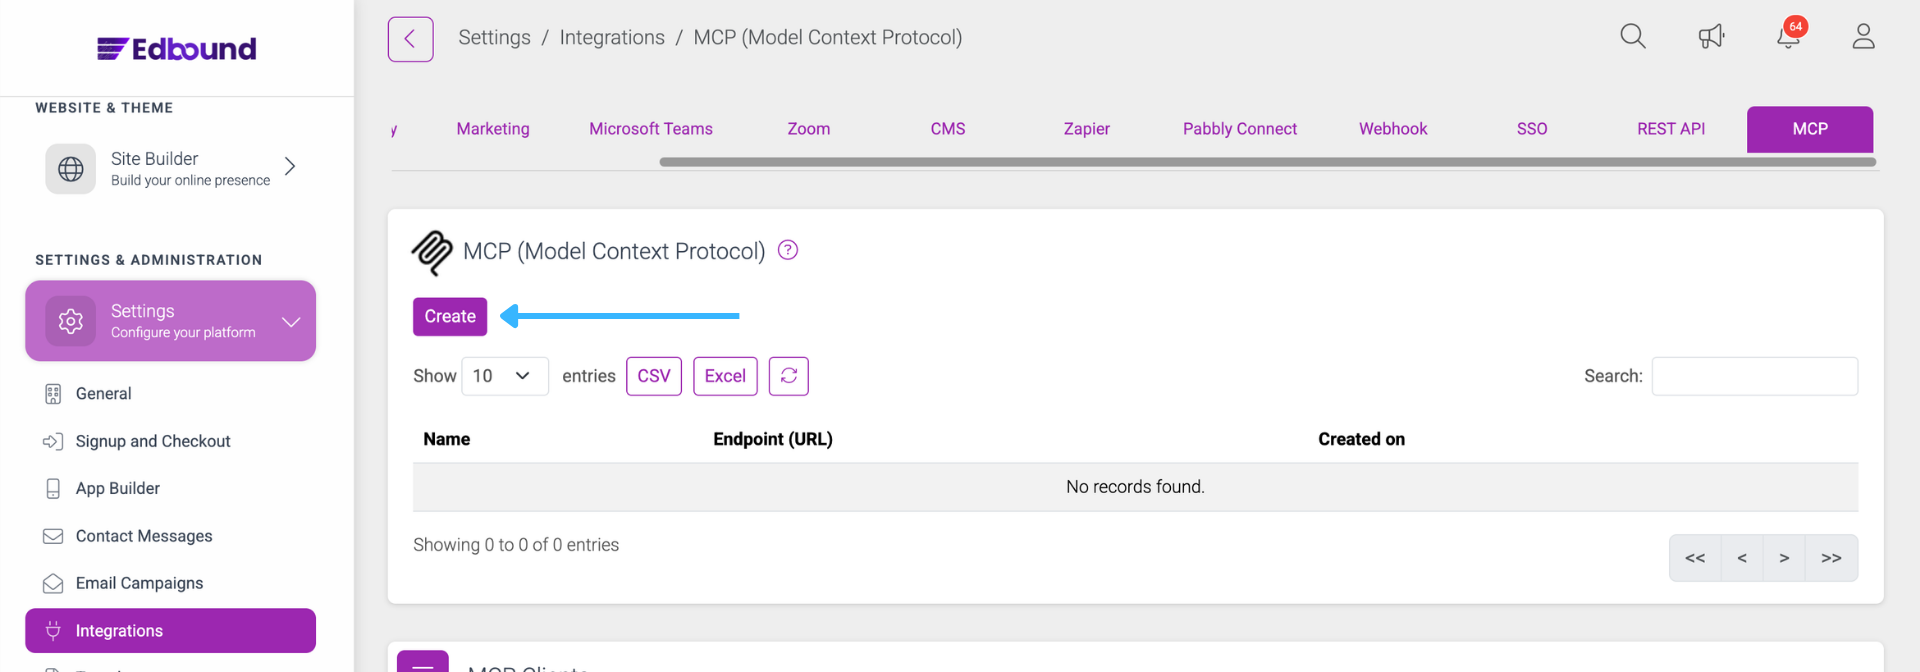
- Go to Settings > Integrations > MCP
- Click Create. A confirmation modal will display the new key
- Copy the Endpoint (URL) from the table — you'll paste this into your AI tool
- Click the settings gear next to your key to open the MCP Tools panel. Here you can enable or disable individual tools for this key, search for a specific tool by name, and review which tools can permanently delete data.
Each MCP key has its own tool permissions. We recommend creating a separate key for each AI tool or use case, and enabling only the tools that key actually needs. Tools that can permanently delete data are flagged with a red CAN PERMANENTLY DELETE DATA badge in the panel. We recommend keeping these disabled unless the workflow specifically requires them. See MCP security best practices for details.

Caution: Treat your MCP key like a password. It can trigger tools connected to your account and access sensitive information.
Claude
Link Claude with Edbound MCP, allowing it to handle real-world workflows through a secure, straightforward setup — all within your conversation window.
Setting up Edbound MCP in Claude
Here's how to connect Edbound AI with Claude.
- Navigate to Claude > Settings
- Click on Connectors > Add custom connector
- Enter a name and paste the Endpoint (URL) from your Edbound account
- Click Add
Accessing Edbound MCP tools in Claude
Once the connector is setup, follow these steps to enable the connection.
- Open a new chat in Claude
- Click the + (plus) button next to the message input box
- Select Connectors from the menu
- In the connectors panel, enable the Edbound toggle
- Start your prompt and ask Claude to perform actions using the enabled Edbound tools

Note: You only need to enable Edbound MCP once. After setup, Edbound tools will be available in all your Claude chats.
Cursor
Use tools from Edbound MCP directly inside Cursor IDE. Enable your AI assistant to perform real-world actions securely — without leaving your coding account.
Setting up Edbound MCP in Cursor
Here's how to setup the Edbound MCP in Cursor.
- Open Cursor settings (⇧ + ⌘ + J on Mac or Ctrl + Shift + J on Windows)
- Go to the MCP Tools tab and click New MCP Server
- Copy and paste the following JSON configuration, replacing YOUR_ENDPOINT_URL with the Endpoint (URL) from your Edbound account:
{
  "mcpServers": {
    "EdboundMCP": {
      "command": "npx",
      "args": [
        "mcp-remote",
        "YOUR_ENDPOINT_URL",
        "--transport",
        "http-only"
      ]
    }
  }
}
- Save the configuration using ⌘ + S or Ctrl + S

Note: Make sure the chat is set to Agent mode to access Edbound MCP tools within Cursor.
Windsurf
Use Edbound MCP directly within Windsurf IDE. Let your AI assistant handle real-world actions through a secure, simple connection — right from your coding environment.
Setting up Edbound MCP in Windsurf
Here's how to enable the Edbound MCP in Windsurf.
- Open Windsurf Settings (⌘ + , on Mac or Ctrl + , on Windows)
- In the left sidebar, click Cascade
- Click Open MCP Registry
- In the MCP Registry screen, click the ⚙ Settings (gear) icon
- This opens the mcp_config.json file
- Paste the MCP server JSON configuration into this file, replacing YOUR_ENDPOINT_URL with your actual Endpoint (URL):
{
  "mcpServers": {
    "EdboundMCP": {
      "command": "npx",
      "args": [
        "mcp-remote",
        "YOUR_ENDPOINT_URL",
        "--transport",
        "http-only"
      ]
    }
  }
}
- Save the file
- After saving, the MCP server will be available in Cascade, and you can start using it in your agent/chat
VS Code
Use tools directly inside Visual Studio Code with Edbound MCP. Allow your AI assistant to perform real-world actions through a secure, simple connection — without leaving your coding account.
Setting up Edbound MCP in Visual Studio Code
- Open the Visual Studio Code Command Palette (⇧ + ⌘ + P on Mac, Ctrl + Shift + P on Windows)
- Type "MCP: Add Server…" and press Enter
- Choose "HTTP (HTTP or Server-Sent Events)" and press Enter
- Paste the Endpoint (URL) from your Edbound account into the "Server URL" field and press Enter
- Provide a server name (e.g., "Edbound") and press Enter
- In the chat, type your prompt and ask GitHub Copilot to perform actions using the enabled Edbound tools
Note: You must have GitHub Copilot enabled and set to Agent mode in Visual Studio Code for Edbound MCP to function correctly.
Other tools
Edbound MCP follows the open Model Context Protocol (MCP) standard, making it compatible with any MCP-enabled AI tool or application.
What you will need
- Endpoint URL: Copy the Endpoint (URL) from your Edbound account
- Transport Type: HTTP (Server-Sent Events)
Generic setup steps
- Open your AI tool's settings or configuration panel
- Look for MCP, Integrations, or External Tools section
- Add a new MCP server connection
- Enter a name (e.g., "Edbound")
- Paste the Endpoint (URL)
- Select HTTP or SSE (Server-Sent Events) as the transport type if prompted
- Save the configuration
- Enable or activate the MCP connection in your AI tool
- For tools using JSON configuration
- If your tool requires a JSON configuration file, use this template:
{
  "mcpServers": {
    "EdboundMCP": {
      "command": "npx",
      "args": [
        "mcp-remote",
        "YOUR_ENDPOINT_URL",
        "--transport",
        "http-only"
      ]
    }
  }
}
- Replace YOUR_ENDPOINT_URL with the Endpoint (URL) from your Edbound account.
Troubleshooting
My AI tool doesn't appear in the list above
If your AI tool isn't listed but supports MCP, follow the steps in the Other tools section above. Most MCP-compatible tools accept either a server URL directly or a JSON configuration. If your tool doesn't support MCP yet, consider reaching out to the developer to request MCP support.
My tool doesn't support remote MCP servers
Some MCP clients only support local stdio servers. You can still connect to Edbound MCP using the mcp-remote bridge with the JSON configuration shown in the Other tools section.
The connection isn't working
- Ensure your AI tool supports the MCP standard
- Verify the endpoint URL is copied correctly without extra spaces
- Check that your network allows outbound HTTPS connections
- Some tools may require you to enable "Agent mode" or a similar feature
I'm getting authentication errors
- Confirm the Endpoint (URL) is the full string from the table, including the id and key parameters
- Try regenerating the key: in Settings → Integrations → MCP, delete the existing key and click Create to generate a new one
- Update your AI tool's configuration with the new endpoint URL
Frequently Asked Questions
Can I create more than one MCP key?
Yes. We recommend creating a separate MCP key for each AI tool or use case, and enabling only the tools each key actually needs. This makes it easier to rotate or revoke access for a specific tool without affecting others.
What happens if I lose my MCP key?
For security reasons, we don't store your endpoint URL in a recoverable form once it's been generated. If you lose your key, delete the existing entry in Settings > Integrations > MCP and click Create to generate a new one. Update your AI tool's configuration with the new endpoint URL.
Can I delete my MCP key and create a new one?
Yes. you can only delete the existing key in Settings > Integrations > MCP and click Create to generate a new one. Do ensure to update your AI tool's configuration with the new endpoint URL. We recommend rotating keys periodically and immediately if you suspect a key has been compromised.
Can I control which tools an AI agent can access?
Yes. Click the settings gear next to any MCP key to open the MCP Tools panel, where you can enable or disable individual tools for that key. We recommend enabling only the tools each AI agent actually needs and disabling tools flagged with the CAN PERMANENTLY DELETE DATA badge unless explicitly required. See Security best practices for details.
Related Articles
Edbound MCP
Connect your AI tools to Edbound using the Model Context Protocol (MCP), an open standard that lets AI assistants interact with your Edbound account. What is MCP? The Model Context Protocol (MCP) is an open standard that defines how AI assistants ...Security best practices
The MCP ecosystem and technology are evolving quickly. Here are our current best practices to help you keep your Edbound account secure. First, always verify you're connecting to Edbound's official MCP endpoint: https://api.knorish.com/mcp... — your ...Supported MCP Tools
Now that you've connected your AI tool to Edbound MCP, let's explore how AI assistants can use Edbound MCP tools to manage users, courses, bundles, live sessions, and website pages in your workspace. These tools work seamlessly together through ...